FREE DELIVERY on everything


 FREE DELIVERY on everything

undefined

FREE UK Next Day Delivery

undefined

FREE Artwork File Check

undefined

White Label Packaging

reviews-reduced.png


Simple Design tips for non-graphic designers
16 Sep 2019
 

Simple Design tips for non-graphic designers


Simple Design tips for non-graphic designers

16 Sep 2019
graphic-design-tips

When your business is young and new (and your budget’s a bit tight), it doesn’t always make sense to hire a professional graphic designer.
And when you’re a non-graphic designer trying to take a DIY approach, it can be a bit overwhelming.

There’s a huge number of amazing graphic design tools out there. But there’s one thing these bits of software simply can’t give you:

Experience.

I’ve been working as a graphic designer for years. And I’ve picked up more than my fair share of tips and tricks along the way.

None of these tips are difficult, and none of them require any advanced knowledge or expertise. But they will all have a huge impact on the designs you create – and they’re all things you can learn and understand in a few minutes or less.

Ready to learn more? Let’s start with the most basic one:

White space is your friend

Every new design starts with a blank page. And it’s incredibly tempting to start filling up that empty space as quickly as possible.

But in many cases, this is a mistake.

We see so many customers trying to cram as much information as they can onto every page, filling every space available until their design ends up crowded and hard to digest.

They forget that the purpose of any good design is to convey information. And when your design gets too busy and cluttered, it becomes difficult for the average person to take it all in.

So here’s one of the most important tips that any non-designer should keep in mind when they’re trying to create their own materials:

Give your design room to breathe.

white space

White space gives your audience time to rest their eyes in between bits of information. It helps them to scan the whole page at a glance to find the bits that are most relevant to them.

You wouldn’t want to read a news story that was one long sentence without any full stops – or a huge single paragraph that took up an entire page.

It’s no different with graphic design. When you keep plenty of white space on the page, you’re giving your audience the chance to rest and process the information you’ve given them.

(And as an added bonus: using white space properly is one of the quickest shortcuts to getting a final design that looks professional.)

Stick to a few fonts

Just like with white space (where people try to cram in as much as possible), we also see lots of non-graphic designers trying to use as many fancy fonts as they can on a single page.

And again, this is a mistake.

A good design is only as complicated as it needs to be. Once you have enough variety to make things visually interesting, that’s the time to stop adding in new things like extra fonts.
So stick to a maximum of 2 (or maybe 3) fonts. One for the headline or strapline, and another for the body or main content.

Font Pairing

Both of your fonts should be easy to read, and you should avoid fancy calligraphy-style fonts wherever you can – they’re simply more difficult to process.

There are loads of elaborate and ornate fonts out there, and it’s easy to get carried away with something unique and distinctive. But in most cases, a fancy font is only going to exhaust your readers after a few lines, so you need to be conservative with how much you use them.

You might get away with something like Londrina Solid (in the image above) for a short headline of five or six words. But if you try to use an unusual font like that for all of the content in your design – especially in a smaller size – it’s going to turn people off.

Instead, you should choose a font for your main body text that’s easy to read (like Sathu in the image above).

Whatever fonts you choose, make sure that they match up and complement each other well. If you’re struggling, you’ll find loads of great examples of font pairings on Pinterest – and you can download and install a huge number of free fonts from places like DaFont or Font Squirrel.

Give your design a hierarchy

We can all agree that any good design should be eye-catching.

But when everything is eye-catching, nothing is.

When your audience scans your design, they need to immediately know which are the most important parts. And that means you need to create a hierarchy of importance (and stick to it!).

Imagine any page of a newspaper. There’s a large, bold headline with a large picture. There are smaller (but still sizeable) headings further down, with smaller pictures to go with them.

And finally, there’s the body text itself, which is smaller and less bold than everything that’s gone before it.
You can apply this same pattern to almost any design you create:

visual-hierarchy

You’ve only got a few seconds to make an impact – so you need to make the most important parts stand out.
The easiest way to remember this is with the ‘F’ shape.

When people first scan a page, they start with the main headline. They then move down a bit and scan the next subheading.

By making these headlines and subheadings larger and more prominent, you’re making this scanning process easier for your audience. They can gloss over the smaller print of your body text to get to the sections of your design that interest them – and that means more of your audience will get the information you’re trying to put across.

Spend time on your call to action

Every design has a purpose. It might be a poster to promote an event, or an advert intended to make a sale.
And that means that every design should end up with the viewer doing something – buying a product, clicking a link, or calling a number.
So if you want your design to be effective, you need to make your call to action pop.
You can do this through the visual hierarchy I mentioned above. But one of the best ways to make a call to action stand out (especially with an online design) is through the use of complementary colours.

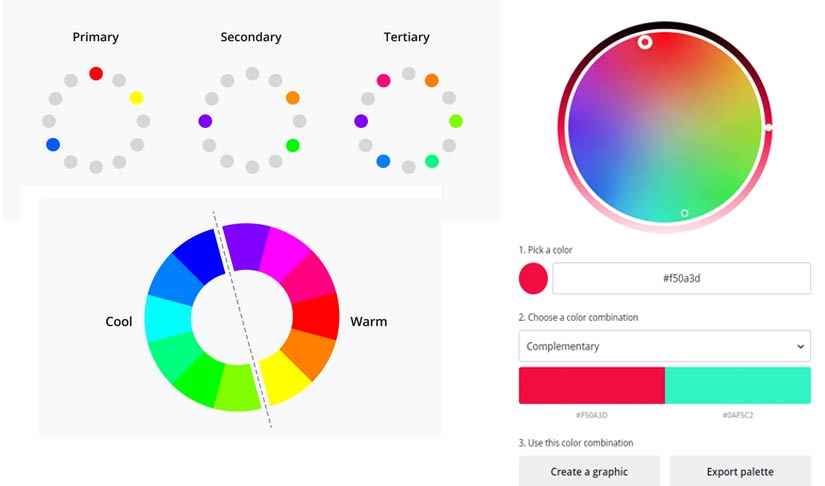
For every colour out there, there’s an opposite colour that stands out against the first. We call this opposite colour a complementary colour – and it’s hugely useful for making things stand out.
So how do you find a complementary colour? With an online colour wheel tool like this one from Canva:

canva-colour-wheel

Once you’ve chosen the colour you’re using for the theme of your design (the red in the left-hand box), you can see the complementary colour (its opposite) in the box on the right.
And when you use that complementary colour for something like a call to action, it’s guaranteed to stand out against the original colour – and people won’t be able to ignore it.

Always start with a grid

One of the first things I was taught about design was the important of a good grid system.
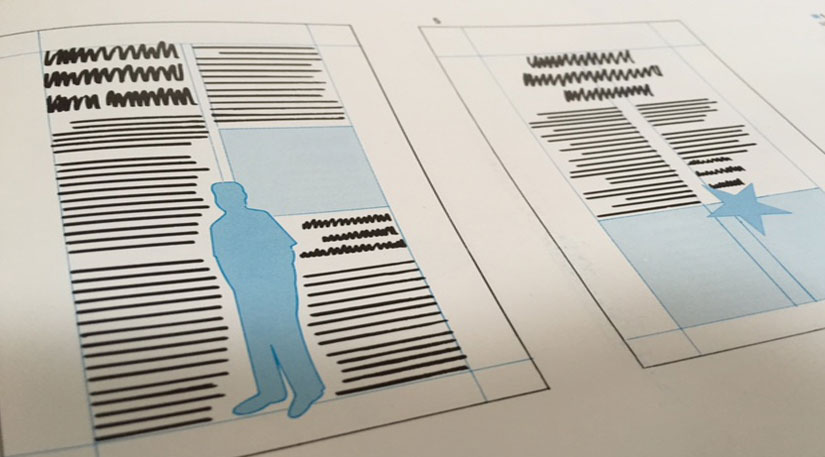
Starting with a grid gives your design a structure. It gives you a pattern that guides the rest of your page, and it allows you to easily replicate that same design for any pages that come after.
Without this structure and order, it’s all too easy to end up with a design that looks cobbled together and randomly constructed.

design grid system

Every magazine, newspaper, or brochure you’ve seen has worked with some form of grid. And if you’re designing something with multiple pages, you should too.

Just like every other tip we’ve mentioned so far, it’s all about making things easier on your viewers’ eyes. When things line up nicely to an invisible grid, it becomes much easier to scan a page and find the right information.

And if you’re creating something big (like a brochure, a catalogue, or a school prospectus), you’ll save yourself so much time and hassle by starting off your first page with a well-planned grid. Once you’re happy with how the first page looks, you can duplicate that page and simply change the information to fit the same grid for every page afterwards. Easy!

Think like a photographer

If you’re designing your own leaflet or poster, there’s a good chance you’ll be handling all of the photography yourself, too.

And unless you’re already a dedicated hobbyist, it can be hard to get the kind of professional photos you need for your final design.

It’s a tough skill to master, and it could take years to fully master the art of photography. But if there’s one handy tip we can give to anyone who needs to take a photo, it’s this:

Understand the rule of thirds.

This is the quickest and easiest shortcut to producing better photos instantly – and it takes almost no theory or practice to start seeing results straight away.

So how does it work?

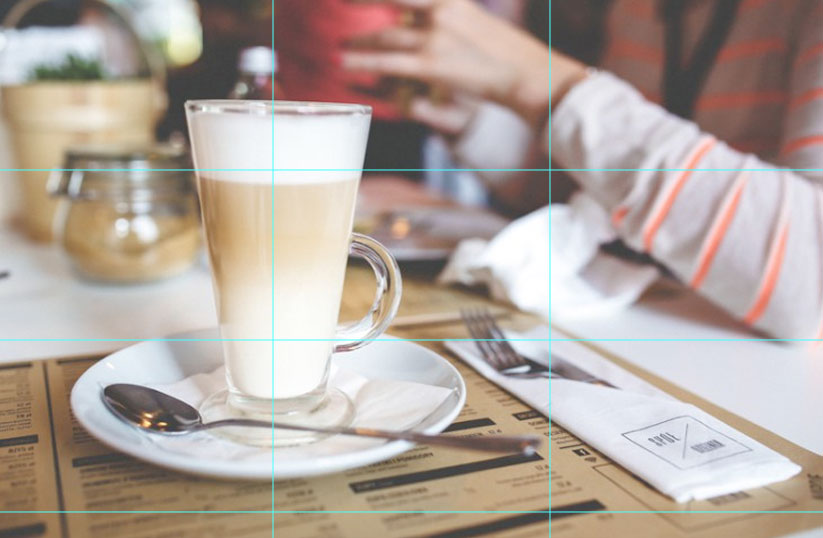
First, you’ll need to divide the scene for your photograph into thirds – both horizontally and vertically:

Rule of thirds

You can then line up the most important parts of your photo with the lines, or the intersection of those lines.

This creates a visually interesting composition that’s far more engaging than a simple dead-centre focus. And importantly, it also creates a sense of motion and action in the photo – even when it’s just a static scene like the one we have here.

As a general rule of thumb, you should position small objects at the intersection of these grid lines, and longer objects that fill the photo (like the wall of a building or the horizon in a picturesque scene) along any one of the grid lines.

And that’s it! With just a few minutes of planning, you’ve turned an amateur photo into something slick, professional, and dynamic. (And you didn’t need to take a single photography lesson.)

Understand the psychology of colours

To a non-graphic designer, choosing a colour theme for your new design is simple. In most cases, you’ll just go for what ‘looks good’.

But if you want your design to achieve the right results, you need to go deeper than that.
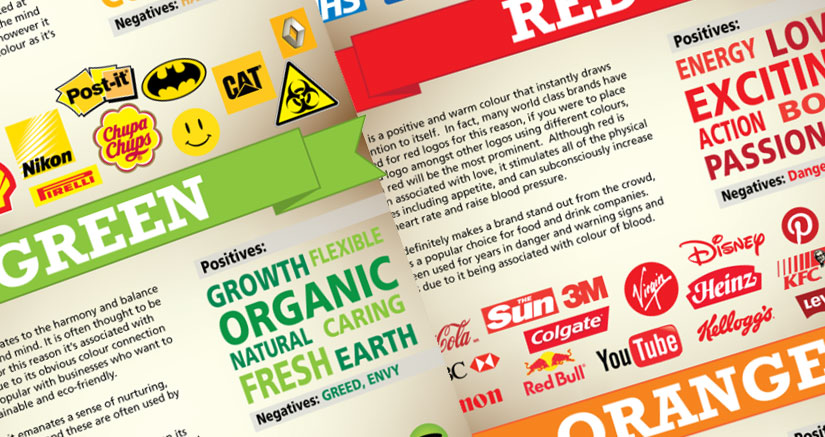
Different colours are tied to different personalities and moods. They create different responses in the people who see them, and they can say different things about your brand and your message in different contexts.

You’ve probably heard that red creates a sense of danger. But it’s also vibrant and exciting, and can generate urgency.

Greens and browns are often associated with natural products, and blues are usually seen as calming or peaceful.

If you’ve already got a company logo with its own distinct colour scheme, you might feel slightly limited by what you can use in your designs. But you’d be surprised at the kinds of colour pairings you can get away with – as long as you don’t overwhelm your audience with too many different clashing colours on one page.

choosing colour for your brand
Choosing colours is a huge topic, but it’s one that’s worth looking into. So check out our infographic how colour defines your  brand to learn more about how choosing the right colour can help you define your brand.

Ready to bring your design to life?

No matter how advanced your design skills are, there’s always room to learn more. We’ve covered quite a bit of ground today, and hopefully some of these tips have been useful.

But if there’s one thing I want you to take away from these lessons, it’s this:

Be consistent.

You want your customers to recognise your brand each and every time they come across. You want your company and your designs to be instantly recognisable with absolutely no effort. And you want your designs to give off the most professional image of you and your business possible.

That doesn’t mean your designs should never change or improve. But it does mean you need to make this a gradual and organic process. If you start making drastic changes from one design to the next, you’ll miss out on the all of the benefits that a consistent brand image can give to your business.

And if you’ve worked your way through these tips and you’re still struggling, there’s no shame in taking inspiration from other people.

I’m constantly scouring through Pinterest and Behance to find new and inventive designs, colour pairings, and photography compositions. They’re full of brilliant designers showcasing their work – and once you start to pay attention to the choices they make and their reasons for doing it, you’ll be picking up fresh new ideas in no time.

Still need design help?

If you’re still struggling to design your marketing materials youself, then don’t forget we offer a comprehensive design service. We have a team of trained Graphic designers designers are here to help you promote your business and bring your ideas to life. Click here to find out more about our design services.


Get a feel for what we do!

Our FREE sample packs are full of great print ideas. They’ll give you a taste of what to expect when ordering your design and printing from us.

Request free sample pack